Tutorials for MutationExplorer
Getting started with MutationExplorer
-
Tutorial 1: Upload structure and mutations: Model upload via PDB ID
In this tutorial, we will aim to reproduce the aGPCR demo.
In the main web view, click on upload structure and mutations
Structures can be uploaded in three different ways:- directly from the wwPDB via an excisting PDB ID
- directly from the AlphafoldDB via UniProtKB ID (UniProtKB names are not possible)
- upload a local PDB:
- No HETATM records (can be removed via filter button)
- TER after each chain
- different and non-empty chain identifiers
- no anisotropy entries or multi-state side-chains
In this tutorial, we will load a structure from the wwPDB, namely 4DLQ, run a long minimization and calculate the RaSP model. You're selections should look like the following picture:
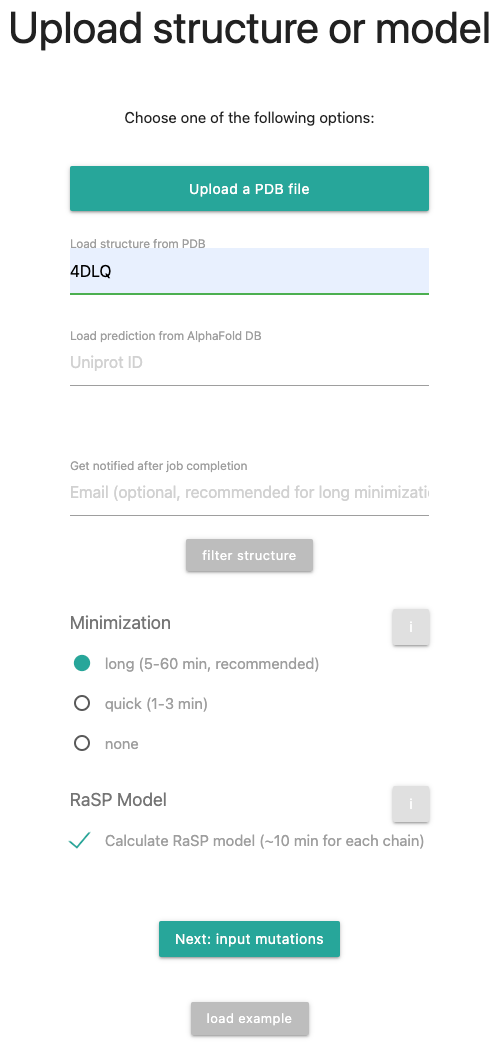
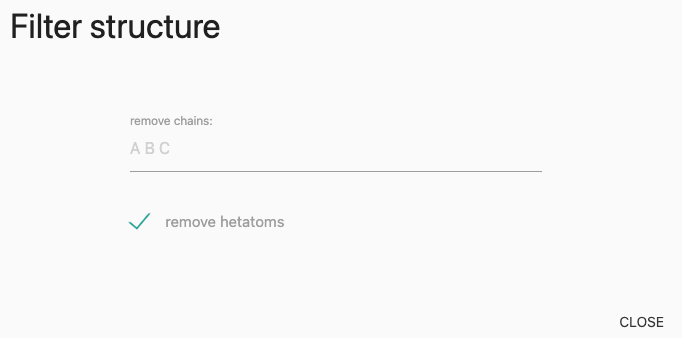
Clicking the button in the form opens a window where you can remove selected chains from the target PDB and remove hetero atoms, if present. Select the type of minimization to be performed on the provided PDB file. If the structure was not minimized using the ROSETTA force field, download mut_0.pdb for a minimized baseline, if the structure was properly minimized, you can go with short minmization.
Enter your E-Mail address to get notified when your minimization is finished.
When you are done, click on
The on page bottom leads to an example MutationExplorer session. -
Tutorial 2a: Upload structure and mutations: define mutations via manual mutation
There are three ways of providing mutational data:
- Manual mutation definition
- Sequence alignment
- Target sequence
In this tutorial, we will focus on a manual mutation definition.
By clicking on the Manual mutation definition, a tab will open that gives information about available PDB chains and amino acids that are within the uploaded PDB, information about the amino acid to one letter code translation, an info button with further explanation and the input form for the mutations.
In our case, the button provides the following information: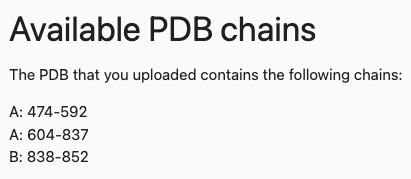
The mutation input field requires a specific format, following a comma separated list of:
- A comma separated list of: CHAIN ':' RESIDUE-ID TARGET-AA-TYPE
- Example: A:23G,B:123A
This mutates the residue in chain A with the PDB residue ID 23 to glycine and in chain B the residue with residue ID 123 to alanine. Note that the all mutations will be done in the same model, multiple individual mutations are best done via the explorer interface.
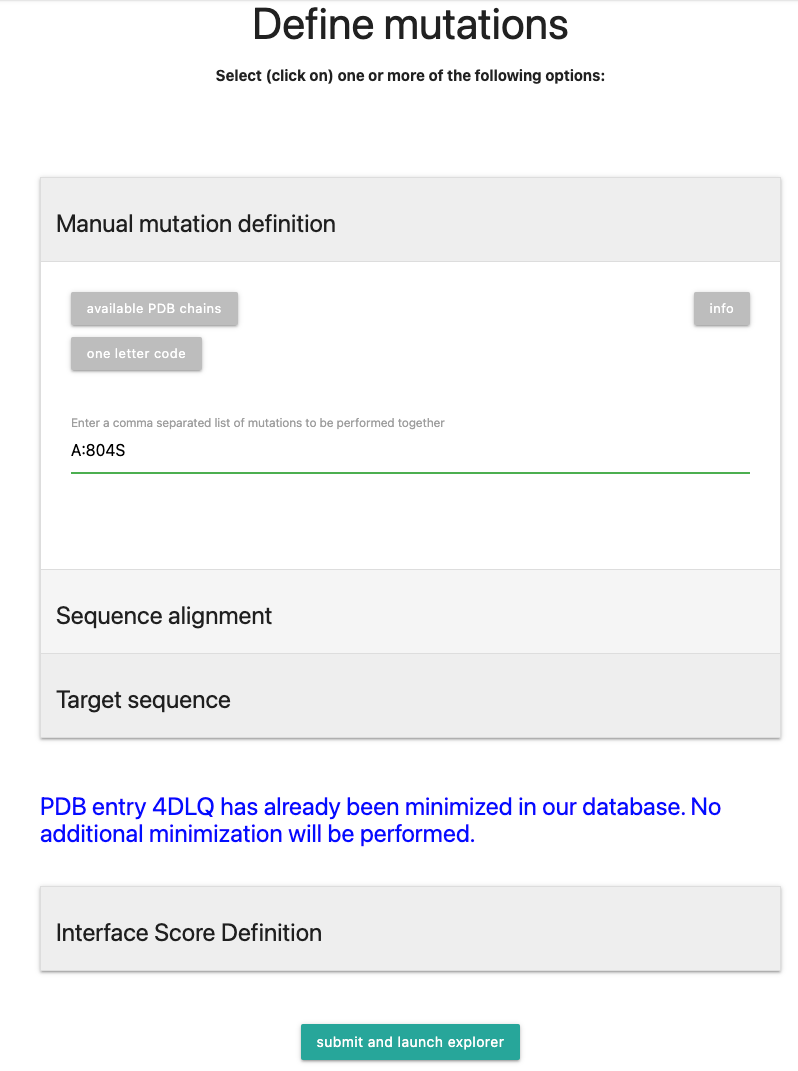
In our example case, we will input
A:804S, a mutation in chain A, residue number 804, with the substitution on Serine (S). Multiple mutations follow the same scheme and need to be separated by a comma.The resulting scheme should look like the picture below:
Click on to proceed to calculation.
You will be forwarded to the status page. As the structure is already in the database and has therefore been minimized, the runtime should be around 10-15 minutes. Note that the waiting time can get reduced as the minimization and RaSP calculation already starts after the structures has been uploaded/selected.When this is finished, you will be re-directed to the MutationExplorer window. The result is displayed below:
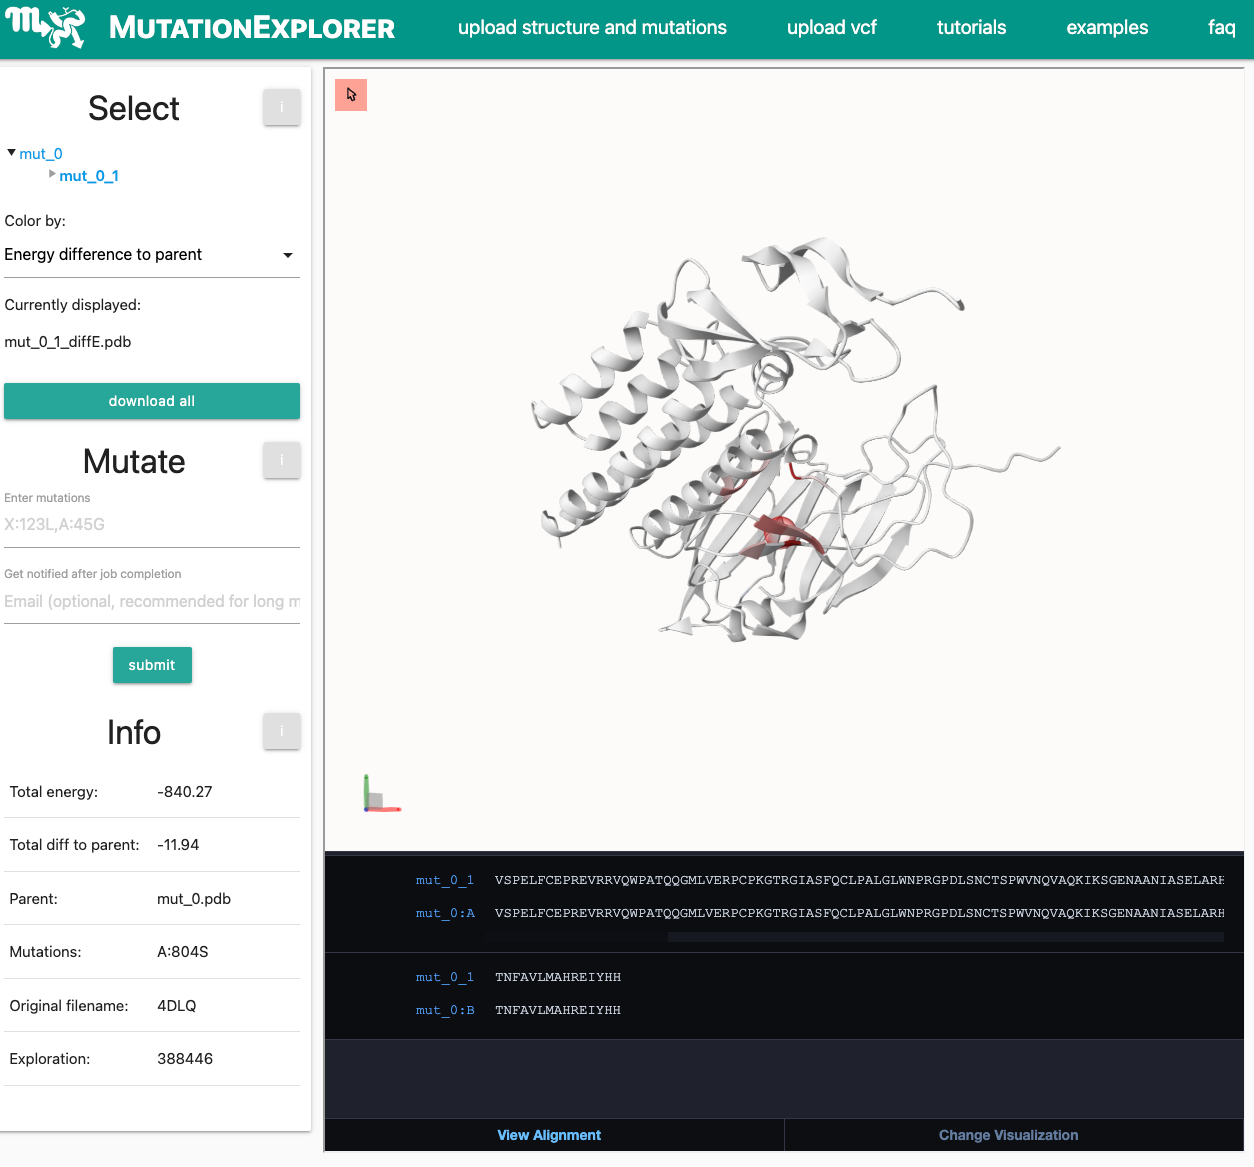
-
Tutorial 2b: Upload structure and mutations: define mutations via sequence alignment
If you like to mutate a structure into another structure via a sequence alignment, you can upload such ClustalW formatted alignment. One of the sequences in the alignment has to match exactly one sequence or be a subsequence in the PDB that you uploaded in previous step. Since one alignment is associated with one chain, you can upload up to three alignments. If you need to mutate more than three chains, you can upload target sequences for the other chains or define mutations manually.
-
Tutorial 2c: Upload structure and mutations: define mutations via target sequence
Provide the sequence for each chain of the uploaded PDB that it will be mutated to. The target chain sequences as a chain of one-letter sequences can be provided as FASTA files (top), pasted directly (center) or directly fetched from UniProtKB (bottom). For each sequence, select the corresponding PDB chain from the dropdown menu. You can also combine different uploads for multi-chain proteins (e.g. Fasta for Chain A, Paste sequence for Chain B). Please ensure that the uploaded/pasted sequences exactly match the sequence in length (check your PDB!) and avoid sequence offsets resulting in mutation of all residues.
-
Tutorial 3: Select structures from UniProt IDs and mutations via a sequence alignment
Model upload via UniProt ID
For this tutorial, we will select UniProt accession AGRL1_RAT with ID O88917. Therefore, fill in the ID, select a long minimization and check for the RaSP Model. The input form should look like this: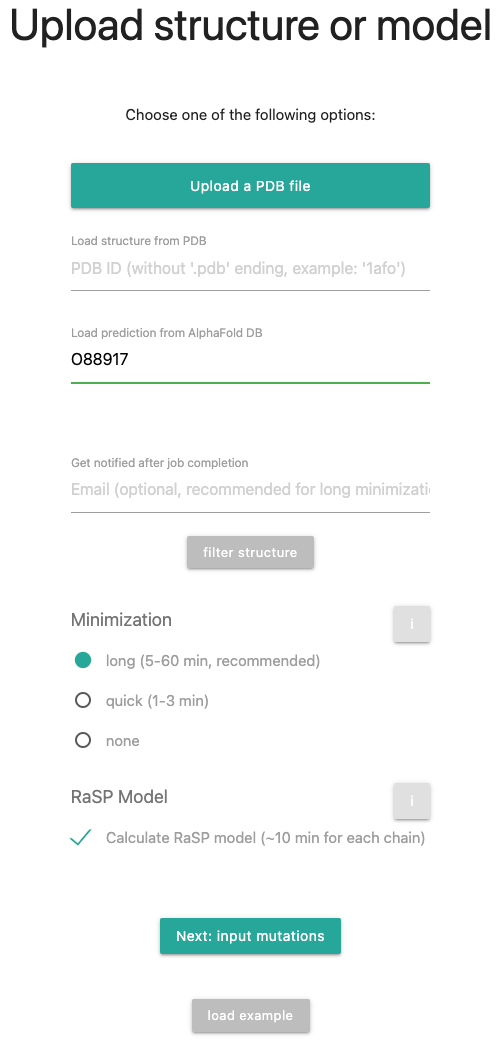
In the meantime, an AlphaFold structure will be fetched and a minimization will be performed if the ID is not yet in the database.Define mutations via a target sequence, fasta file or UniProt ID
Next, we fill select the field Target sequence where we will inset a sequence via the upload or paste option.In general, the user needs to provide the sequence for each chain of the uploaded PDB to be mutated. The target chain sequences as a chain of one-letter sequences can be provided as FASTA files (top), pasted directly (center) or directly fetched from UniProtKB (bottom). For each sequence, select the corresponding PDB chain from the dropdown menu. You can also combine different uploads for multi-chain proteins (e.g. Fasta for Chain A, Paste sequence for Chain B). You do not need to ensure that the sequences are a perfect match - but note that alignment errors can occure. For the best results, please ensure that the uploaded/pasted sequences are not too distant in sequence space to the sequence of the structure.
In this tutorial, the sequence originates from O94910|AGRL1_HUMAN. It is also possible to specify the UniProt ID O94910 directly.
Alternatively, past in the UniProt ID O94910 or upload the fasta file. Note that a rough alignment will be performed. No additional amino acids will be inserted into the structure.
If the sequence has been pasted in, it will look like the following picture:
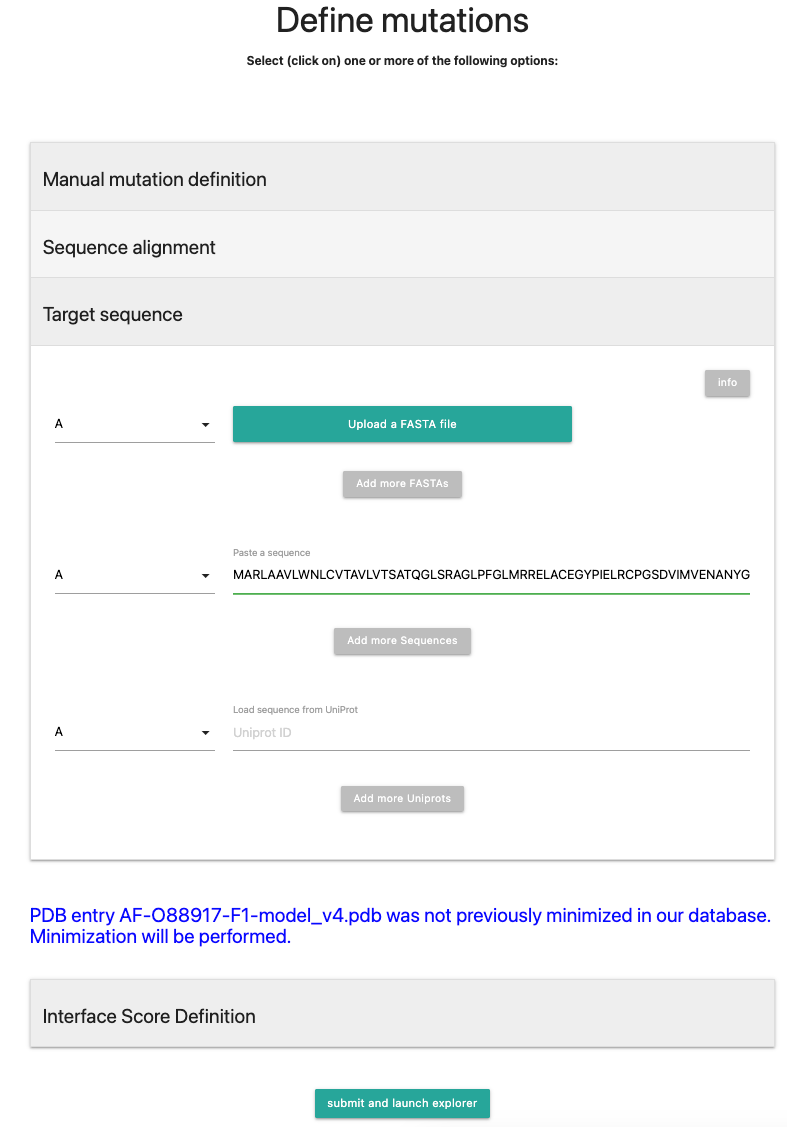
Next, press .
-
Tutorial 4: Perform interface mutations
In this tutorial, we want to show how to generate interface mutations, e.g. to modify the interface of two different proteins. It will give us the binding score of the 2 proteins. The example we will use is the structure 3SN6, where a beta-adrenergic receptor is interacting with the Gs-protein. Please note, that it is not possible to modify DNA/RNA or substrate interactions.
First, select 3SN6 in your structure upload, remove the hetero atoms via the filter structure option and remove chains B, G and N.
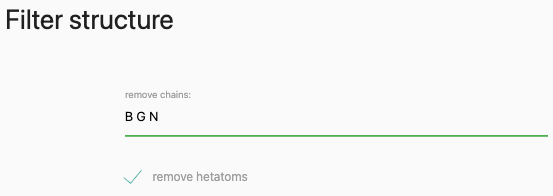
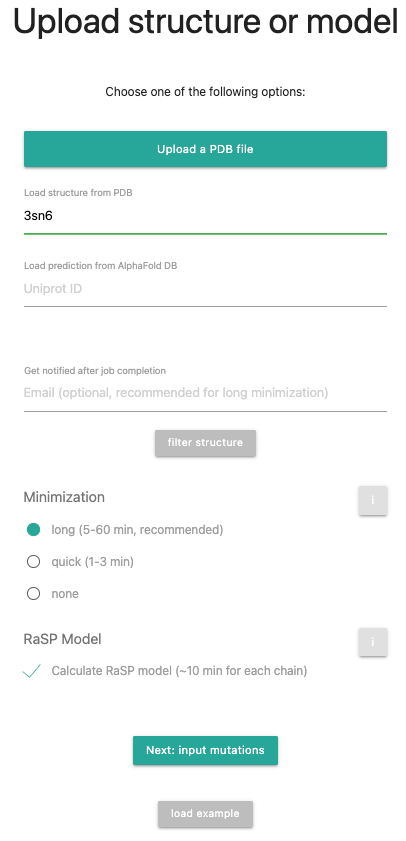
Press to proceed.
Now we will select the "Interface Score Definition" tab. There you have 3 options:- No calculation
- Define manual calculation
- Complete calculation
We will in this tutorial define the interface manually. If you want to have further explanation about the other modes, check out the FAQ or Documentation.
For this, select Chain R to be on the Right and Chain A on the Left.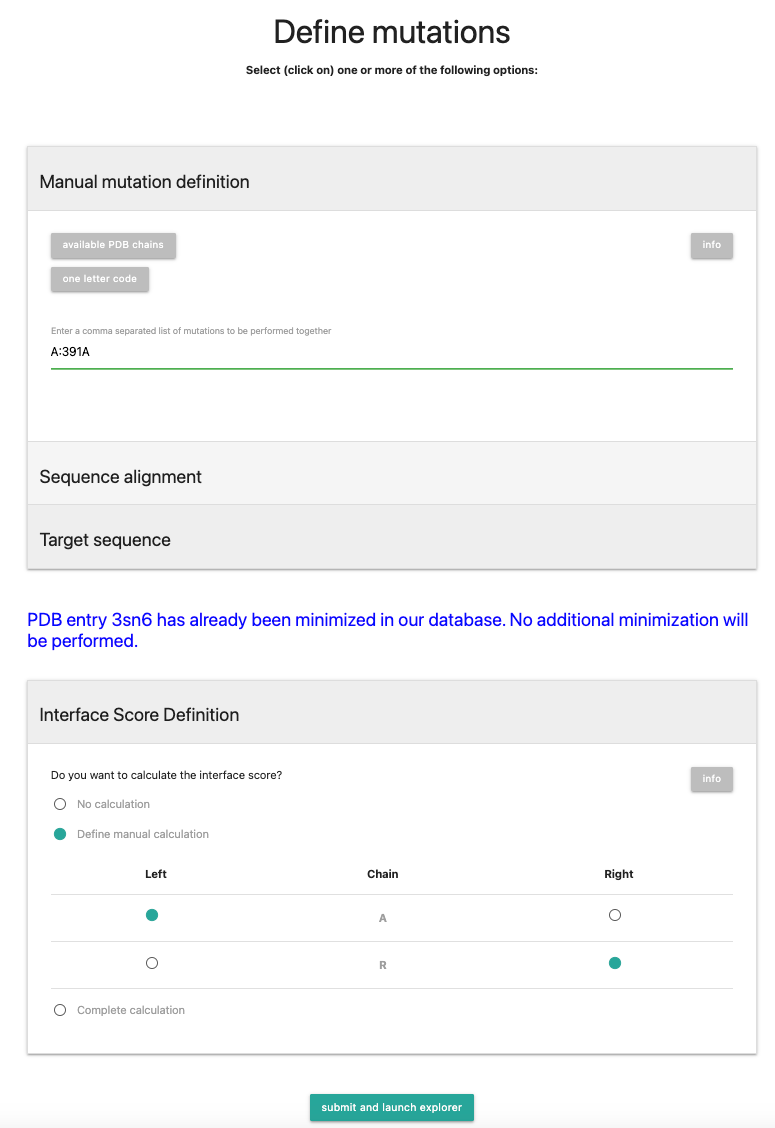
Next, press
This run will take approximately 40 minutes before you are forwarded to the result page. You can speed up the process by not checking RaSP calculations. -
Tutorial 5: Homology modeling of multiple states of a protein
What AlphaFold is not able to do is to model different states of a protein. This can be achieved using MutationExplorer. For many classes and families of proteins, multiple states are available in the PDB. Different states can be modeled By selecting different PDBs as base structure and follow these steps:
- Under upload structure and mutations enter the PDB ID of the base structure or upload a model from your machine
- Ideally select the long minimization (for homology modeling the RaSP option can be disabled) and click the next button
-
For uploading the sequence to which you want to modify the base structure to there are multiple
choices:
- Paste or upload it under target sequence (when the target is rather similar to your base structure / template)
- If your target sequence has an Uniprot ID you can enter that
- You will have to indicate to which chain in the base structure the sequence shall be applied (available chains are listed)
- If it is a very remote relationship, follow the AlignMe tutorial further down
- for other cases either also use AlignMe, or upload an alignment from another source via sequence alignment
The part that cannot be done by MutationExplorer is the minimization of the model. The user can choose between different possibilities, e.g. using Rosetta as explained above, or by performing MD simulations and many others. Whatever approach the user choosed, it requires sufficient sampling and thus has to be done locally.
-
Tutorial 6: Upload VCF (sequencing data)
vCF, the tab-delimited Variant Call Format, is incredibly powerful and flexible. As example of the minimal input format used to upload SNPs to MutationExplorer, see the sample file RTEL1.vcf, described in our manuscript and the documentation (click on the name to download it).
This example file contains the following input:
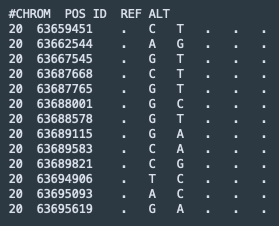
This tutorial lists the steps you will take to upload RTEL1.vcf and replicate the example page RTEL1 MutationExplorer results results. Under the hood, the sequence data will be translated into mutations, an AlphaFold structure will be generated of the associated protein and the variants will be highlighted. Further (if selected), the RaSP model will calculate energy differences for future variants.
RTEL1 Tutorial Steps
- From the home page, click on
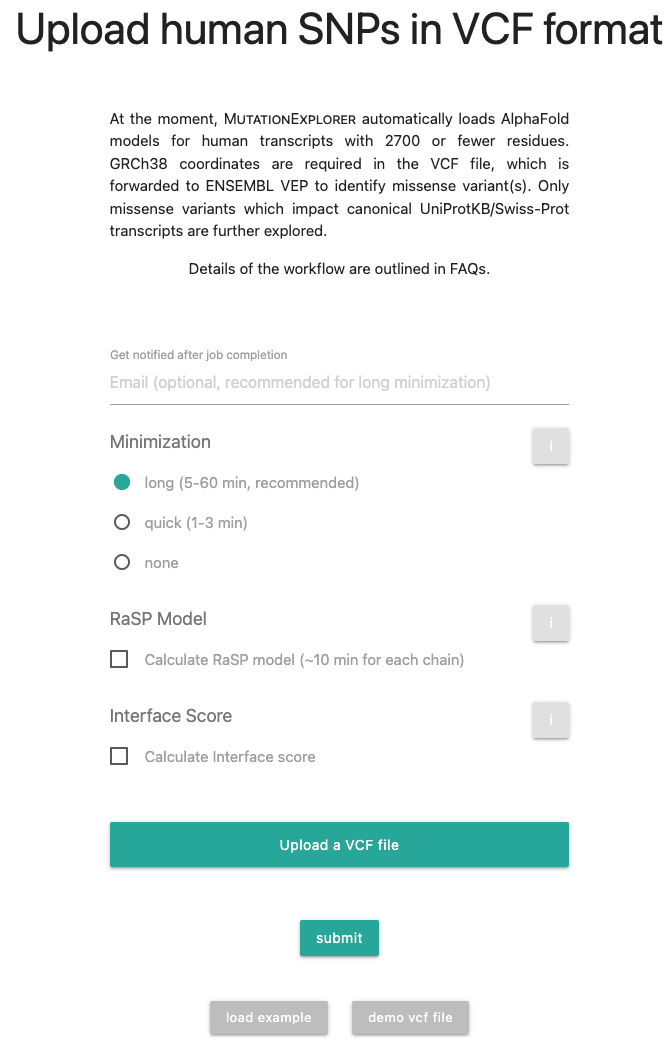
and you will see a new form with a detailed explanation of MutationExplorer’s VCF workflow and limitations.
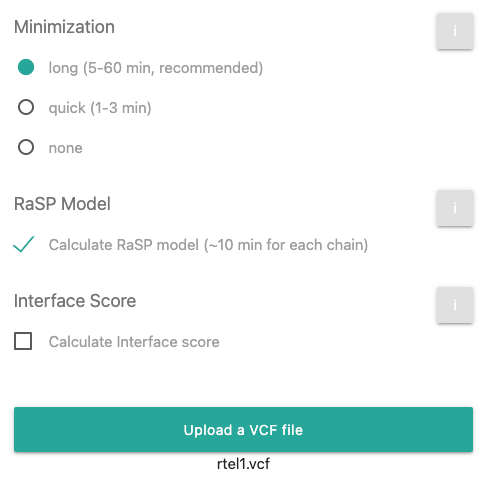
You can select different minimization length as described in the documentation, calculate
energies via the RaSP model or calculate interface scores. Optionally, an email can be added to
obtain notifications when a minimization job has been completed.
-
In this tutorial, we select long minimization to replicate the energy values of our
example page. If quick has been selected, be aware that numerical precision might
differ. None is fastest, but energetic calculations will be meaningless.
Click the at right for more details. -
Click the
 under RaSP f you wish this stability
prediction calculation.
Click the at right for more details. -
Now click on the
button and include the above mentioned sample VCF file. After this step, the page should look
like this:
-
Click
to start the calculations. The webpage tab at the top of the browser window will immediately
indicate a refresh in progress. Very soon you are transported to a new page showing Status
of Job nnnnn. Be patient as the calculation proceeds. It is a good idea to right-click
on Result Page for later references. However, this URL will not be active until the
various calculations complete (indicated by the message "This url does not belong to the
app."). At that time, you will be automatically redirected to this same Result
Page. Your patience will be well rewarded.
See here an example of the status file: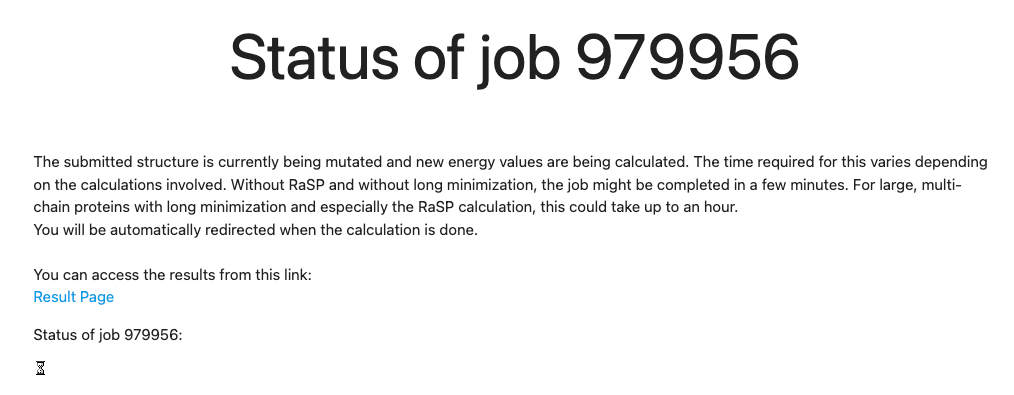
- Start Calculation
- Start fixbb for mut_0_1
- fixbb for mut_0_1 done
- Start RaSP calculation for mut_0_1 with chain A
Troubleshooting your VCF uploads
The processes between the submission of your VCF file, and the display of an AlphaFold model are complex. Your VCF upload will be processed by the Ensembl Variant Effect Predictor (VEP), running locally on the MutationExplorer server. If your results are unexpected, please follow our guidelines in the documentation or FAQ.After 10 minute waiting time, you will be forwarded to the result page:
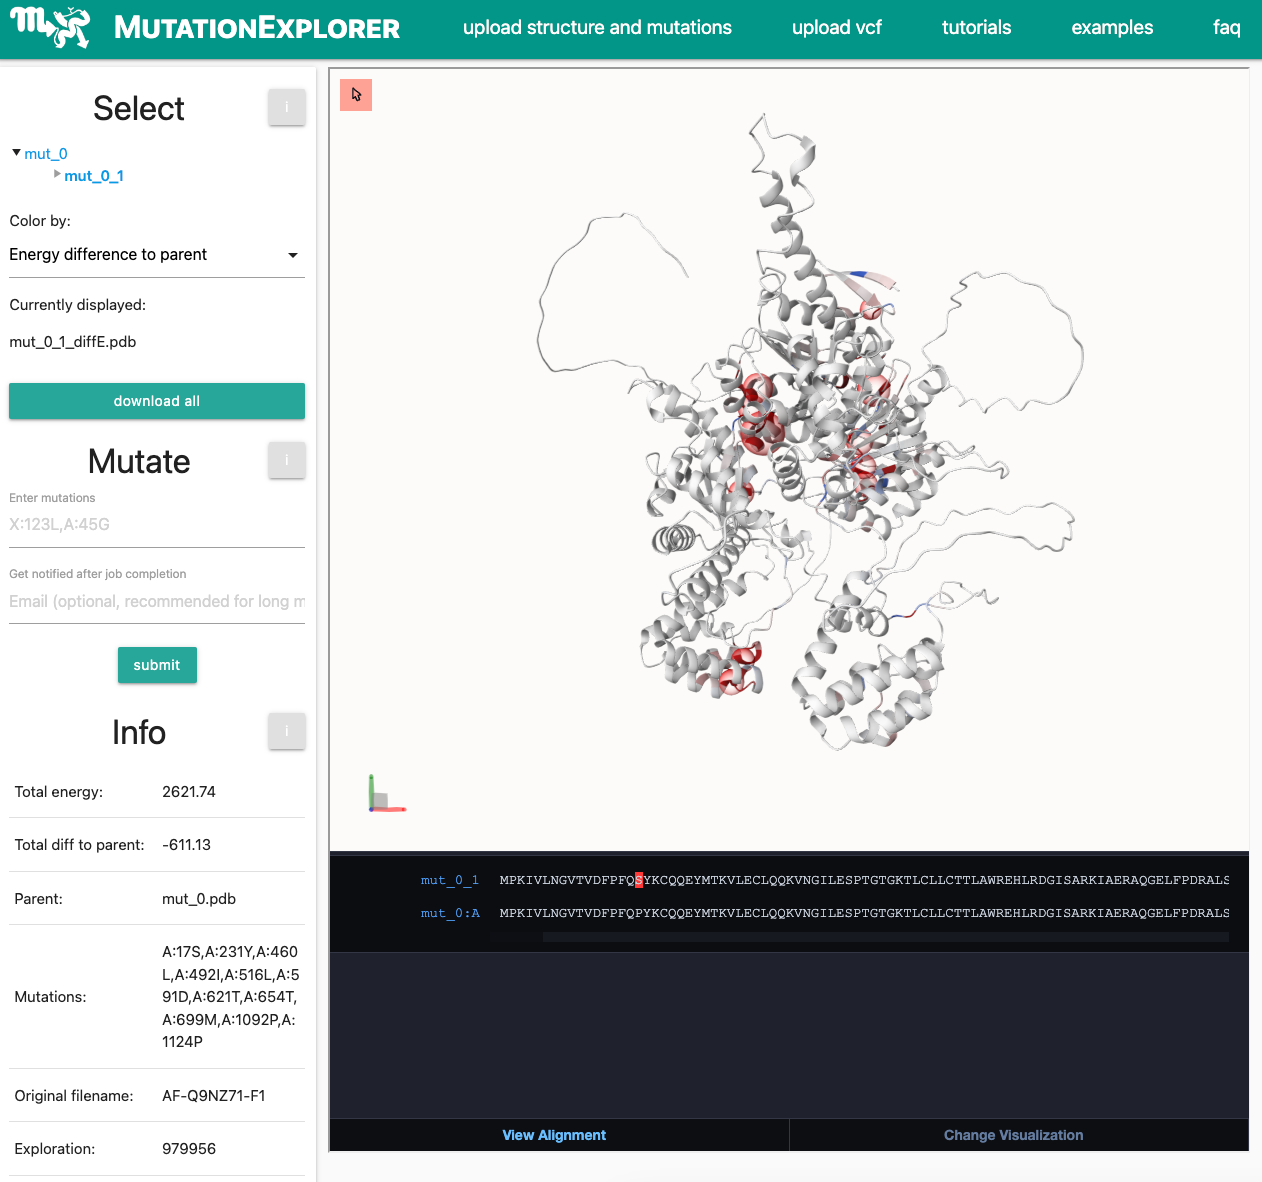
While seeing missense variants from the public VEP website is encouraging, other difficulties may remain.
For example:- MutationExplorer can only analyze one protein at a time. You will need to split your VCF file and make separate runs, if your VCF file generates missense variations for multiple genes.
- The VEP often returns Ensembl transcript Ids which do not map to Swiss-Prot curated, canonical UniProt transcript IDs. Without a UniProt ID, MutationExplorer cannot retrieve an AlphaFold model. You may manually check cross-references between ENST… transcript IDs and Uniprot IDs at ensembl.org and uniprot.org, respectively.
- Inputting GRCh37/hg19 genomic positions, which are indistinguishably formatted, will result in wildly incorrect results. You must first “liftover” such coordinates, by converting your VCF coordinates to BED format, then submitting them to https://genome.ucsc.edu/cgi-bin/hgLiftOver. As you use these kinds of tools, remember that MutationExplorer requires GRCh38.
- From the home page, click on
and you will see a new form with a detailed explanation of MutationExplorer’s VCF workflow and limitations.
You can select different minimization length as described in the documentation, calculate
energies via the RaSP model or calculate interface scores. Optionally, an email can be added to
obtain notifications when a minimization job has been completed.
-
Tutorial 7: Start from the AlignMe webserver - discover sequence alignments in 3DAlignMe is a software package and webserver for detecting similarities between proteins, which are too subtle to be detected on the sequence level using standard methods.
https://www.bioinfo.mpg.de/AlignMe/AlignMePW.html
Follow these steps:- paste two sequences in Fasta format into the windows
- if the sequences are rather similar select the 'fast' alignment
- if there is little similarity on a sequence level, use one of the three other modes.
- submit
- on the result page, click the button to MutationExplorer
Now you are on a form of MutationExplorer where you can upload one or two structures on which the alignments are mapped.- define base and target sequence from your alignment: the dropdown will display all fasta headers that you entered on the AlignMe website
- upload structure for the base sequence (required)
- define chain in PDB (crucial when you have e.g. homomultimers, otherwise the chain is determined automatically)
- optional: upload structure for target sequence
- define chain in PDB (crucial for homomultimers)
- select energy minimization (default is 'none')
- select RaSP (default is 'off')
- submit
The result window will display different things according to what you uploaded.
Single PDB- base PDB is mutated to target sequence
- structure is colored by sequence conservation
- coloring by energy is available (quality depends on selection of minimization)
- coloring by hydrophobicity is available
Two PDBs- PDBs are structurally aligned (superimposed) according to sequence alignment
- structure is colored by sequence conservation
- coloring by energy is available (quality depends on selection of minimization)
- coloring by hydrophobicity is available
The main stage: MutationExplorer result window
-
General
In the explorer view, you will be presented with information about your set of mutations, relative per-residue energies and visualization of the protein. We will first have a closer look to the info bar on the left. It is divided into 3 sections, Select, Mutate and Info:

-
Left side (info bar)
We will first have a closer look to the info bar on the left. It is divided into 3 sections, Select, Mutate and Info:
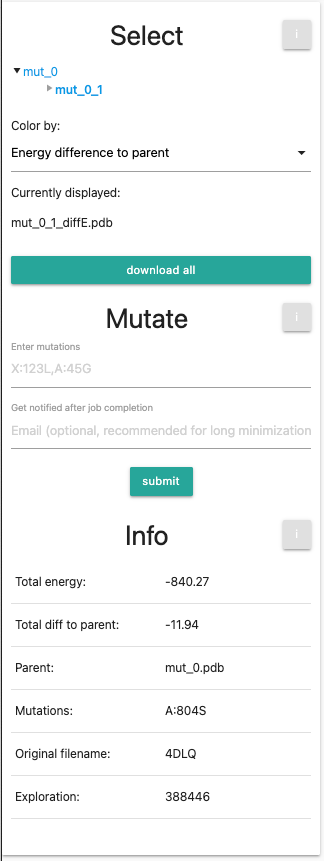
Select
- Tree View: Outlines the mutations that were performed, where mut_0 will be the unmutated, minimized PDB file that serves as the basis of mutations. You can select entries in the tree view for individual mutations. Every newly generated PDB will be a new entry. If you performed your own calculation, you will see only 2 entries, namely mut_0 and mut_0_1. If you selected the session from the examples, you will see 3 further entries, namely mut_0_2-4. In both cased, the current visualized entry (mut_0_1) is marked in bold. Go ahead and try switching between the different selections, the orientation and zoom of the protein will remain the same.
-
Color by Dropdown menu: provides different coloration methods:
- Absolute energy
- Energy difference to parent
- Absolute hydrophobicity
- Difference in hydrophobicity to parent
- Conservation
- Absolute interface score
- Difference in interface score to parent
-
Currently displayed shows the current selection fo the entry and the coloring scheme.
- absE - Absolute energy
- diffE - Energy difference to parent
- HyPh - Absolute hydrophobicity
- diffHyPh - Hydrophobicity difference to parent
- cons - Sequence conservation
- diffIF - Interface score difference to parent
- IF - Absolute interface score
- pack all PDB files into a ZIP archive for downloading
Mutate
- Enter mutations field: allows for further mutations to be entered, with the root being the currently active protein (printed in bold in the tree view). The info field below provides info on the currently selected protein.
- Get notified after job completion: you input your email to get a notification when the run is completed.
If you are using the example, you can skip this part, but feel free to try out different mutations yourself. We will now perform 3 rounds of mutations. We want them to be introduced to our original (minimized) pdb, so we first select mut_0 in the selection tree. Next, we enter the first additional mutation into the mutation field: A:815S. The left panel should now look like this:
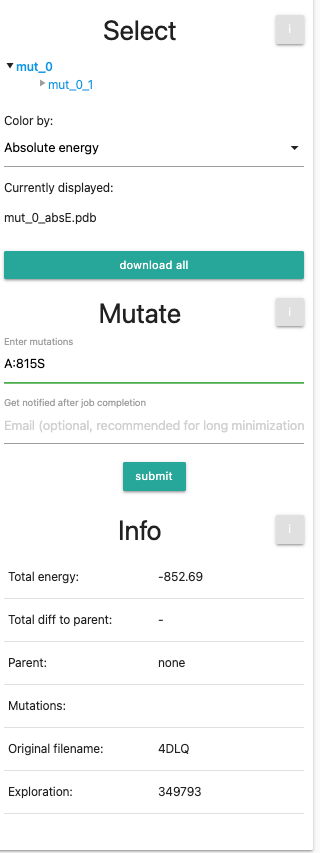
After this, we will do the same for mutation A:806A and A:803Y. Do not forget to click on the initial structure mut_0 before submitting the run.
Finally, we will end up with the same setting as the example aGPCR.Now we will do a final set of mutations: we will select our first variant mut_0_1 and input the 3 mutations (A:815S,A:806A,A:803Y). This will introduce all 4 mutations into the wild-type.
Your panel should look like the following: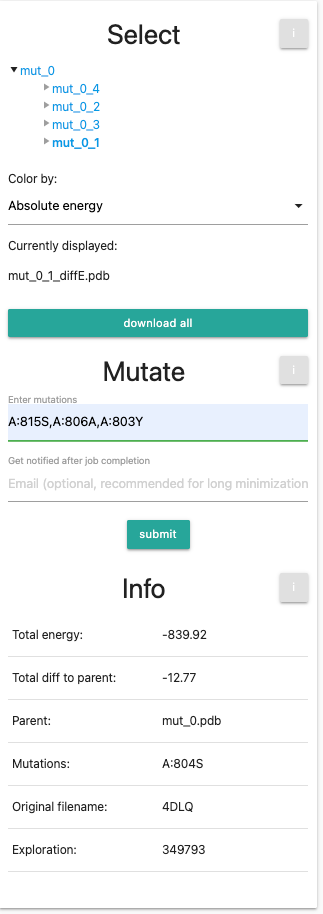
Info
Finally, at the bottom we see the info panel. This table is showing information about your current selection: Total Energy (Rosetta Energy units),total energy difference to parent, the parent structure, introduced mutations, the original file name and the exploration ID. For this tutorial, it might look similar to this: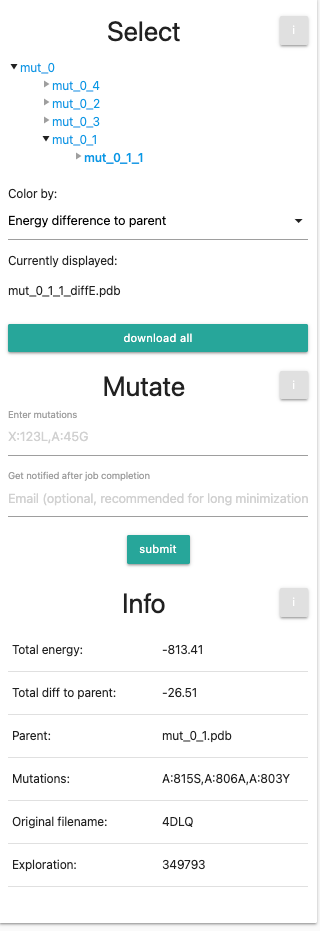
-
Right side (main visualization window)
At the top center (main part), we find the Mol* visualization of the protein with a blue-white-red color gradient, where blue represents negative values and red positive values in the default color setting. The mutated residues are highlighted with a red translucent sphere. Hovering over the cartoon will highlight residues and display a tooltip with further information in the bottom right corner.
You can see one example here: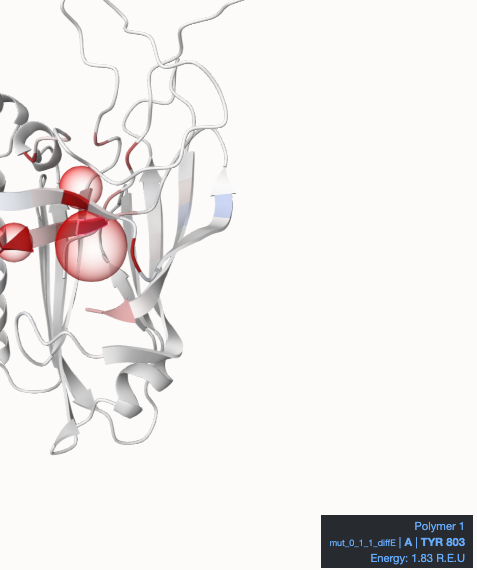
At the bottom, you can find the MDSrv Window: By default, it shows a sequence alignment of your root and mutated protein with the currently mutated residue highlighted in red. Hovering over cartoon residues will also highlight the residue in the alignment and vice-versa. It will further display a tool-tip on the right side with information about the highlighted residue.
You can see one example here:
Clicking on any highlighted residue will zoom in, showing the selected residue and its surroundings in a ball-and-stick view. Different carbon colors indicate protein chains, otherwise atoms are colors by type. Dashed lines indicate residue-residue interactions like hydrogen bonds.
Try it out - you might see something similar to this: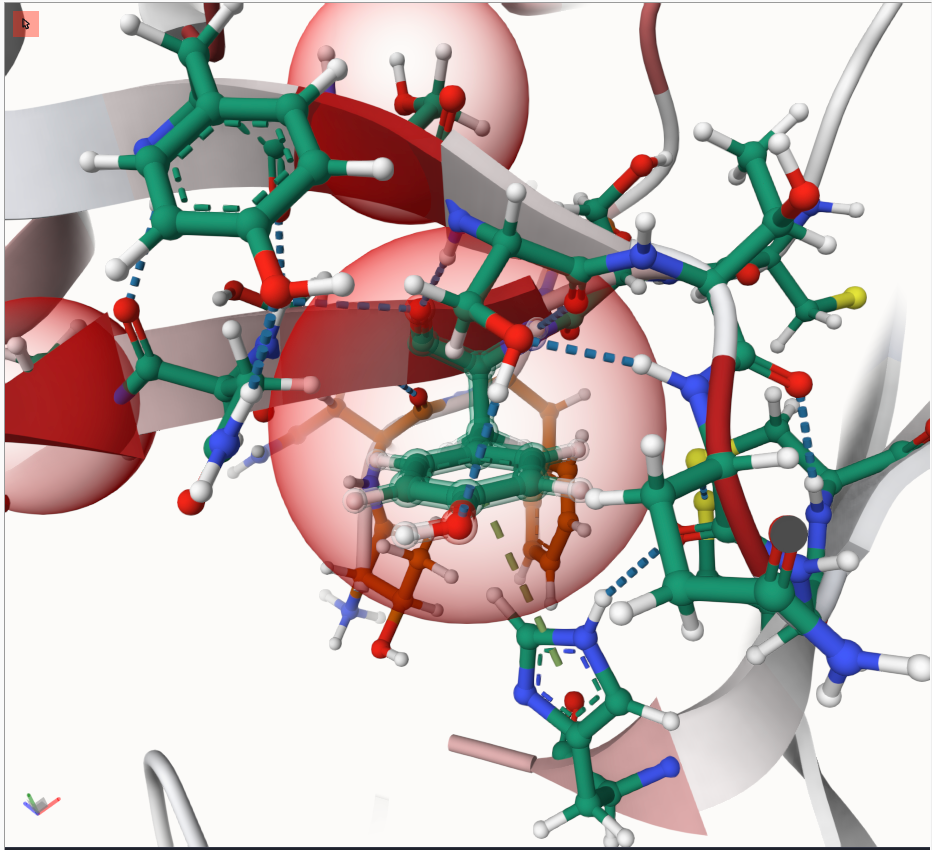
Change visualisation
Now we want to modify the visualization. Click therefore on the bottom-right button in the alignment section. The result will look similar to this:
-
Visualize RaSP mutations
To visualize the effect for all potential other mutations, activate the RaSP panel. Click therefore at the red mouse at the top-left of the visualization panel:

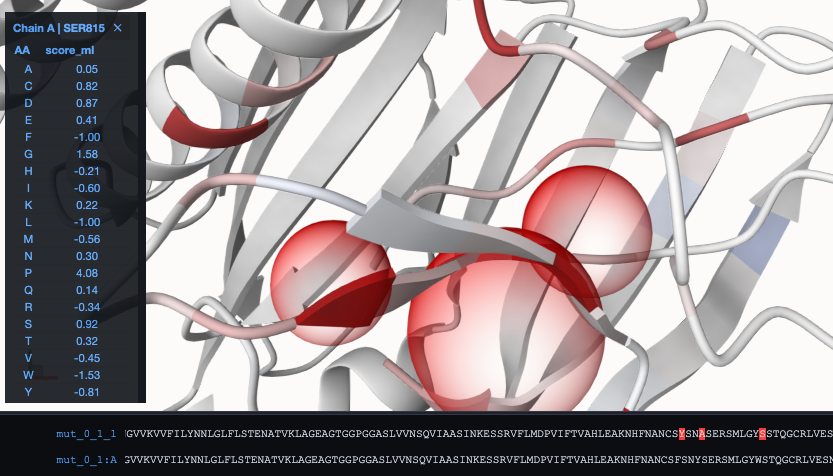
As a result, we can see that the energy difference to the WT got reduced in comparison to mut_0_1_1. When switching now to coloring according to the absolute energy, we can see the red parts, that could be targets for further modification towards a stabilized structure:
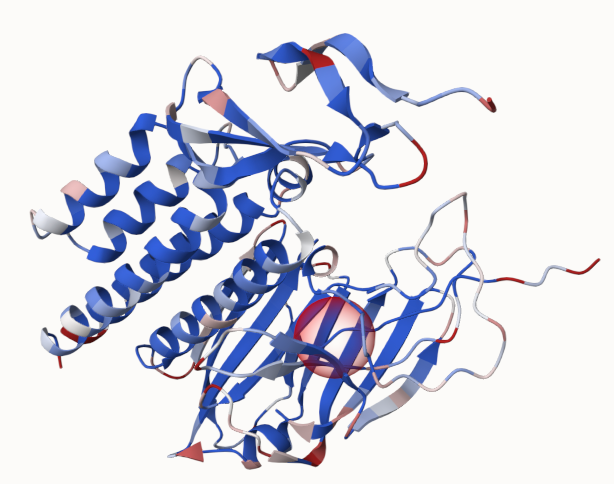
Happy mutating!
Please cite: MutationExplorer: a webserver for mutation of proteins and 3D visualization of energetic impacts
If you are interested in further modifications, or result interprestion, please check out the manual, FAQ or reach out to us.
For further information, see the FAQs.
Also check out the example section.